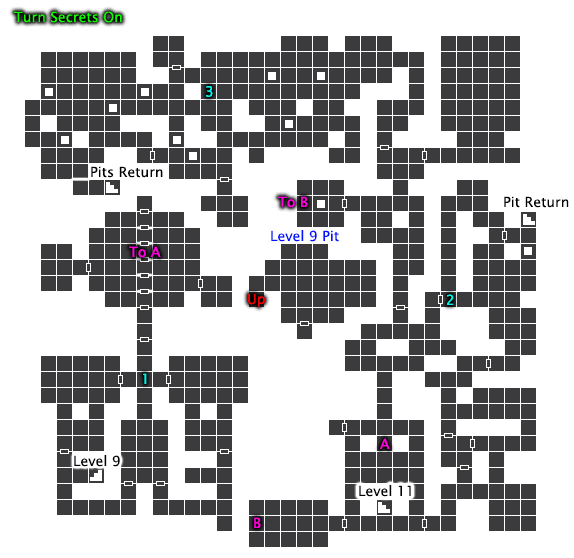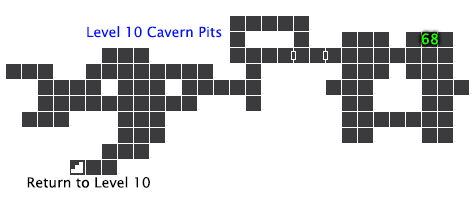
 Legend of Grimrock Walkthrough:
Level 10
You are almost at the end, and in this level you will encounter one of the toughest enemies of the game, that Goromorg!

1. Sanctum Access
When you first come down the stairs, go right and snag the Round Key first, then come back to the stairs (since you can't open the gate that way yet) and go through the other gate. Just on the other side of the pillar is a hidden keyhole under a tapestry for that key. This will unleash enemies, so be prepared.
There is only a stone face in this room, so go south, then east. There is a Red Gem hidden behind another tapestry by the northwest gate. Move it to the south east, then place something on the pad in the middle. Get the Round Key from here too, then move to far south gate and open the gate to the insects, and quickly go back to where we grabbed the round key to prevent getting sandwiched in. Once everything is dead, grab the gloves from the section that opened up just north of the gate.
There will be a second keyhole in the pillar here too, which will release more enemies again. Once done, it is time to get out of this room. Make your way back to the hall between the 2 rooms that we opened. Pick up the Red Gem on your way out! The button on the west side will operate the energy, the other the doors. Release the energy, then press the button to change the doors just as it enters the hall so it can pass through the open door and allow you access to the Inner Sanctum.
A pressure plate will be one the other side of that door and stepping into this area will open all the doors and release some very powerful nasties. (You may want to rest before continuing). The Goromorg can easily kill your entire party, so be really careful. They have 2 healths, their shield and life. Until you do enough damage to the shield they will be unharmed. Ranged and strafing attack work best against then, but becareful since they have full ranged motion, which means they can move like you can.
Once in, pick up the quarells to the east if you want them, then take the path west, loot the area and press the shiney button. More Goromorg will be released! I prefer to run back to the first area and deal with them there instead of being in the open where they can surround you. Take the teleporter in the middle when your done.
Items Found: Baked Maggot (2), Crossbow Quarrels (3), Gauntlets of Valor, Mole Jerky, Note from Toorum, Red Gem, Round Keys (2), Tar Bead (3), Throwing Axes (2)
2. Tunnels of Life
You will find a Crystal of Life in this area, but if you want to "free" a prisoner, you may want to save it for later (it sometimes works for the quest if it is used, but not always). You can already go down if you want, but you won't get very far. The Iron Door is just west of the crystal and needs that Red Gem, and the button to continue is near the door to the northeast.
 Taking the northeast path means more bugs and Goromorg. The room that is sealed with doors has the last of the Valor armor. The path branches off in places, but there is only one way out to the west. Before you take the exit, there is a pit in the northeast corner. Dive in, take out the Crabs and walk up the stairs to a secret. Just walk on the floor switch to get back and take the chain to the west to continue.
Search this room for treasure, then go south and press the button on the north wall for another secret and another access to the pillar of life. Find the door to the north, but place an object on the floor switch and quickly strafe to the side to avoid the lighting.
A door requiring 2 keys are west, so you only have one path to follow, north. Here it will split into 2 more areas. Go east into the shrine first.
There is a Key on display here, but we know it is never that easy. Picking up the key as is will spawn Sewer Lurkers and Goromorg, but you can always place an item on the alter first, then pick up the key if you want to avoid the fight, with the loss of experience. When your done, head back out and take the door west to the cavern.
Items Found: Blooddrop Bloosom (2), Cave Nettle, Crookhorn Longbow, Fire Quarrel (4), Frost Bomb (5), Full Helmet, Greaves of Valor, Longsword, Milkreed, Note From Toorum, Ornate Key, Poison Bomb (2), Shield of the Elements, Shuriken (4), Tar Bead, Throwing Axes (3)
3. Toorum's Cavern
There are several enemies here, so do yourself a favor, let an ogre out, then close the door. The scavengers in there will make the fight a lot harder, or if the Scavengers are first, deal with the Ogres later, but never at once. One of the Ogres has a sack filled with Alchemy Ingredients. This is a huge area, so fight off all the enemies first, then look for exits.
Dive into northwestern pit in the East Cavern (and walk around to the far northeast side to find the Ice Fall Hammer. This will free many enemies, so be careful. Now backtrack and follow the path out. You will find several slimes on your way, but by now they shouldn't be too much of a threat. Collect the loot and go up the stairs.

We are now in the west side of the cavern. Take the north door first and take care of the lizards, loot the area, then take the south door where Scavengers live.
The northwest area of this cavern has 5 levers. Toorum's note tells you that the pillars are the key. 5 Pillars, 5 Levers. Starting from the left, the pattern is down, down, up, down, up. Go to the south and grab the key. Expect Goromorgs.
On the way back to the entrance search the pillar closest to it for a button. This will open a chamber just southeast where you will find your penpal. With Toorum in hand, go back to the Crystal of Life and put his remains on it to resurrect him. You won't meet him here, but it does give an achievement and allow you to play as him on your next playthrough! (See: How to play as Toorum)
Now go back and open that door that needed those keys north of here. Don't go through the teleporter yet! There is a button in the northwest corner. Jump in the pit and press the button on the southwest side to prevent being killed. Now collect the loot and go back up.
Push the button in the corner again and go through the teleporter and get the Prison Key (surprisingly it is safe to do so this time). Now we can go down to the next level.
Items Found: Ancient Axe, Boiled Crag Beetle, Burrow Rat Shank (2), Hardstone Bracelet, Icefall Hammer, Note from Toorum (4), Phalanx Helmet, Pitroot Bread (2), Poison Bombs (3), Prison Key, Remains of Toorum, Sack, Scaled Cloak, Shuriken, Skull, Slime Bell, Tar Bead (4), Tattered Cloak, Throwing Axe, Throwing Knives (4)
Continue to Level 11 - 13
Quick Level Select:
Level 01 Level 02 Level 03 Level 04 Level 05 Level 06 Level 07 Level 08 Level 09 Level 10 Levels 11-13
Other Sections:
Character Guide Potions Secrets Spellcraft Treasures Walkthrough Gallery

