
 Legend of Grimrock Walkthrough:
Level 9
You are almost done, so of course the difficulty is going to spike. Two new enemies will be found in this level, the Ice Lizards and Shrakk Torr, as well as several new deadly traps.
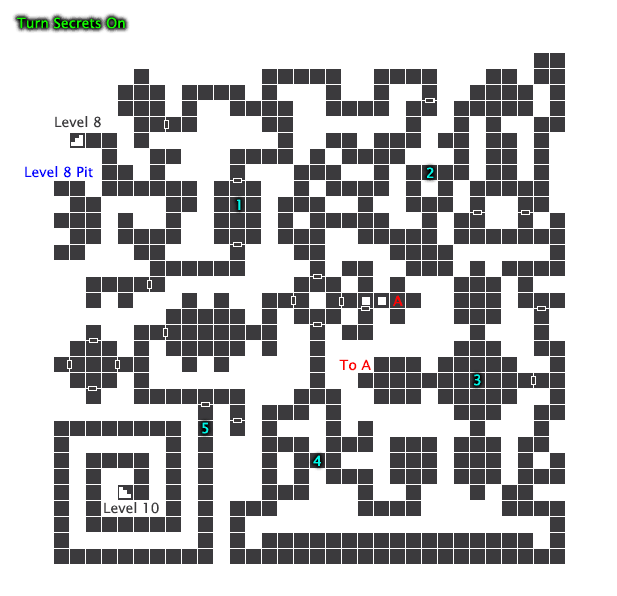
1. Checker Challenge
Before you start, you will need at least one rock (another is found in the level) and a skull in your inventory. If you don't have them, head back to level 8 to get one.
Welcome to level 9! You will find wall tapestries in this level, which can be cut with a weapon. Down the hall to the south you will find a Pitroot Bread and a button under tapestries. The button is right beside the door to the Holy Scriptures. In this room you will find some scrolls and the Uggardian holds a key. Be sure to grab whatever you can from this area, even if you find it useless.
Go back and take the past east to the checkered room. Place items here in an alternating pattern like a checker board starting with the two outside switches near the entrance. This is where to use all that garbage you have weighing you down. A scroll is hidden under the southwest tapestry too.
Take the path the to your left and raid the armoury, where you will encounter more Uggardians. Be sure to take out the junk blocking you in the north and push the button for the secret.
Now head back and take the other path into the hallway. Keep a close eye and watch for sudden changes. This area loves to turn you around, so keep an eye on your compass so you know where you are going. Keep going until you reach the next door.
Items Found: Broadhead Arrow (5), Iron Basinet, Lightning Bomb, Longsword, Ornate Key, Norja, Pitroot Bread, scrolls (2), Ring Mail
2. Temple Grounds
There are several warnings coming to this area, and for good reason. Ice Lizards! They are immune to ice so use fire, lots of fire! One of them hold a Gold Key to keep killing until they are all gone, and even then they will likely sneak up on you from time to time since they re-spawn. Check the northwest area first to find a button that opens a secret closer to the entrance of this area. You also need 3 torches ahead, so grab them as you travel.
The southwest door holds the Lightning Bolt scroll, which you NEED to remove from the alcove (it doesn't need to be in your inventory, just not in the alcove), so head southeast and flip the switch, then head back to open the door. Now return to the switch then continue north. More lizards fill this area too, so hopefully you have lots of Tar Bead to make healing potions. The path is long, with many little areas to hide in, but eventually you will find your way south to the gate.
Item Found: Circlet of War, Fire Bomb, Gold Key, Lightning Bomb (3), Pitfighter Gauntlets, Scroll of Lightning Bolt, Tar Bead (2)
3. Outer Sanctum
Once you pass the gate, you may want to close it behind you to ensure Lizards don't attack from behind. As you head south you will find a door to your right that leads to the Outer Sanctum.
This area is useless without 3 torches and 2 rocks or throwing weapons. If you don't have Torches, they can be found in the path we just took. There is 1 Rock found after the Pillared Hallway. You need to complete this trial to continue the level so you NEED those items!
You need that Ornate Key we found at the entrance to open the door. Once inside, it will close behind you and Uggardians will attack. The button to open the path back is on the southwest wall. There are 3 ways to proceed, all 3 with a riddle and a teleporter. Each time you will start at the statues again. Go Forward and you will get a clue on a scroll. III-II-I-III. You will notice that each teleporters have a number of lines of text in their description: 1, 2 or 3. The correct order is forward, right, left, then forward again.
 More pits will greet you in this area. The spot where you are standing is keeping the first one closed, so drop an item on it. and the next one is timed. Don't go left or right to those statues or you'll get gassed. First, dive into the pit! (You probably expected that by now.) This is where you need the rocks and torches. Light the torches and find where the shadows cross (just north east of the teleporter) and throw a stone north and east to open the gate. You need a rock in the future again, so be sure to pick them back up!
After you are done, take the teleporter back up and play with the pit. First, you need to face toward the teleporter and time your steps so as soon as the pit closes, you strafe left, then dart across the teleporter. Flip the switch, then step onto the teleporter as soon as the pit closes again, the strafe to one of your sides. Now, strafe across the pit again, this time leaving an object on the switch on the other side of the bars so you can flip that switch too. The door will open up to another key (You need this key so don't forget to pick it up!).
Take the teleporter back and leave the Sanctum, then head south again. (If you missed the button to open the door earlier it is at the south-west corner of the central room.)
Items Found: Cuirass of Valor, Ornate Key, Riddle Scroll, Tar Bead (3)
4. Pillared Hallway
Remember that slithering riddle? This is it. Follow that scroll for the two sides of the hall. 2 steps on the left, 1 on the right, 1 on the left, 3 on the right, 2 on the left (then repeat again). Once free, you will find yourself in a maze-like mess of corridors. In the northeast area you will find a note and a rock and a sealed door to the north. Go south-east first, but prepare for a new enemy, the Shrakk Torr! They shouldn't be too much of a problem though. Behind the end wall tapestry you will find the final piece of the Lurker Gear!
No go to back and head to the north sealed door. There is a button just a few spaces on your left before the door to open it. Taking the book will open the entire center of this entire level (as long as you removed the key and the scroll earlier), allowing you to visit past places easily. Step on the floor plate on the east to continue.
The next room will have a Crystal of Live and 4 Alcoves each with a riddles. You need 4 objects to pass: an arrow, rock, skull and key. If you don't have the skull, you need to go back up to previous levels to get one (level 7 has one by the stairs).
Game's bane with head of steel = arrow or quarrel
Tear of the land = rock
Unraveller of Mysteries = key
Severed Dread = skull
Once the door is open, you can safely take your items back if you wish.
Items Found: Book of Infinite Wisdom, Note from Toorum, Lurker Hood, Sulphurious Potion, Rock

5. The Ogre's Trap
Along the way you will find another treasury. Once again, the choice is yours, you only have 1 key (unless you saved one from last time). You can also save it again for the last one further down.
North = book of Infinite Wisdom
West = 2 Frost Bombs, Plate Greaves
South = Flarefeather Cap, Serpent Bracer
Once done, continue down the hall, past the gate to the Iron Door. You need a Bone Amulet (are you wearing one from the earlier levels?)
Now head back to that gate and use your Ornate Key. Continue down the long halls until you find the ogre, then backtrack all the way as fast as you can as these long halls are perfect for him to make pancakes out of you. I find it best to get him back to the Treasury. On your way back, along the first long path west, there is a button on the north wall. Don't worry about pressing it yet. Make your way into the center to encounter another ogre. This time that long hall with the button will close and that button will be your emergency exit! Take the same tactic as the first one.
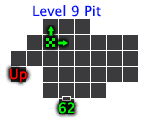
With the second Ogre gone, you are safe to head down to the next level!
Item Found: Zhandul's Orb
Continue to Level 10
Quick Level Select:
Level 01 Level 02 Level 03 Level 04 Level 05 Level 06 Level 07 Level 08 Level 09 Level 10 Levels 11-13
Other Sections:
Character Guide Potions Secrets Spellcraft Treasures Walkthrough Gallery