
 Legend of Grimrock Walkthrough:
Level 1
The first level lets you figure out a lot of how the game works, without the constant pressure of death, but there is still a lot to do. As you can see on the map below, there is a lot to explore in this game. Each mark on this map will give you information when you hover over each one, as well as take you to the place in the walkthrough.
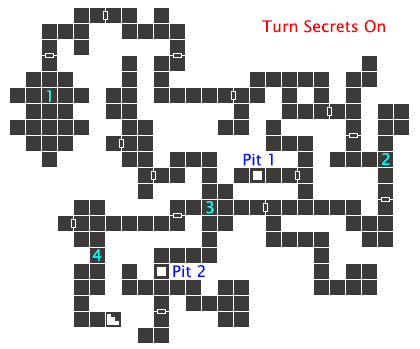
1. Dungeon Entrance
Once you have landed in the starting dungeon, make your way to the torch hanging on the wall and equip it. Taking the torch will open the gate, but before you leave, there is a secret button on the southeast wall.
Now head back through the open gate and continue through the linear corridor, grabbing the torch, and pulling the chain to continue through the next gate. As you make your way forward, you will find your more armor and your first weapon. You are going to need them, so best equip it on your warrior now. The lever to open the next gate is just to the right of it, making it hard to miss.
The next gate offers you a bit more of a puzzle, but it is still easily resolved. You just have to leave something on the plate to leave the path open. There is a rock left there, but rocks have other uses (like for throwing at creatures and ammo), and torches are very common, so I recommend just dropping one of them here.
Just after the switch gate, cut to the right to get the Brass Key. Continue down the path, don't forget the next rock, then open up the door by clicking on it with the key you just found.
Items Found: Brass Key, Cudgel, Lurker Boots, Peasant's Breeches, Peasant's Tunic, Rock (2), Shuriken
2. Snails and Pits
The next gate also requires a key, as per the lock found on the wall, but getting it requires a bit more of a search. Take the north path where you will be given tip about a loose rock, which refers to the button that is at the dead end. Grab the Iron Key and continue through the gate.
Follow the path to the east again, but don't rush down the next area. Make sure you have the weapons and armor you have found equipped, then take the path to the north first and enter your first battle. Those rocks we found earlier are very useful for your back characters to do some extra damage, and also picking up torches out of your inventory and throwing them helps too. Torches also act as a melee weapon in the front row since you only came across 1 weapon so far. Regardless, this Giant Snail is not going to be much of a problem.
To attack, just right-click the weapon in the portrait. All normal attacks work this way, including ranged weapons. Spells are a bit more complicated though. To cast a spell, right-click on the casters glowing hands, wand or orb, then enter in the spell runes needed for the spell. You learn what runes are needed by finding scrolls for the different spells.
Once you are done with the snail, pick up the loot (don't forget any items you threw, and make your way back to gate. You will also notice that the snail dropped some food. Food is very important for keeping your party alive, so unless you can't carry anymore, be sure to pick up all food you come across. As the game progresses, you will come across food that isn't so heavy, so always eat the heaviest food you have.
At the next corner you will find a throwing knife and more Giant Snails. There is one guarding the door, and another to the path to the north. It is best to back up so both can't attack you at the same time. Since the next door also requires a key, it is time to do some exploring.
There is loot in the north and south passages, and the key is behind the gate. To get it, you need to pass another pressure switch puzzle. Take a torch and throw it by dropping it on the top half of the screen. With Key in hand, head back to that door and continue.
There will be a lot of pits in the game, many have some very useful items and all have some way to get back up. You do take damage for falling into the pit, but as long as your characters are well fed, their health will regenerate in no time. This pit has nothing in it, so it isn't worth the damage.
Items Found: Baked Maggot, Iron Key (2), Knife, Leather Boots, Leather Pants, Loin Cloth, Pitroot Bread, Rock (2), Sandals, Throwing Knife
3. The Blue Gems
There will be a path to each side, and a statue in the wall that needs new eyes. Let's head north first. After opening the new gate, you will come across a new enemy, the Herder. Since there are 4 of them, it is best to let them come to you so you don't get surrounded. Hit them with whatever you got until they die.
There is some more loot scattered throughout this area. The far north corridor has the lever needed to open the gate here. Collect the Blue Gem, and if you want another secret there is a button on the north wall in the cell. The new room opens just to the north of button.
Now let's go back, then take the southern path. There is a pit here too, but it can be accessed from the next level too without taking the damage, so it is up to you if you want to dive in. Pull the lever on the wall before the pit to safely cross.
A Giant Snail will be lurking around the corner, so don't get caught with your back turned. There is some loot in the adjoining rooms here. The floor plate will open the gate which is holding back another 3 Giant Snails. The Blue Gem is inside but the gate will lock behind you.
Don't worry, there is a small rock button on the wall to the right of where you picked up the Gem. There is a catch though, something needs to be left on the inner floor plate or it will reset. Leave anything there since you can turn around and pick it up again once you are on the other side of the gate.
Now head back to that face that needed eyes and place the 2 Blue Gems we got into them, and quickly turn to your left and fight your first Skeletal Warrior. This thing has a much longer range than the previous enemies, but still falls quickly. Get your first spear and shield from his corpse. The spear is great for anyone in the back row that needs a weapon, but it becomes less useful later on.
Items Found: Blue Gem (2), Cave Nettle (2), Dagger, Grim Caps (2), Loin Cloth, Rock, Scroll of Fireburst, Tar Bead (2), Tattered Cloak
4. The Iron Door
Once past the skeleton, you will find your first Iron Door, and a scroll introducing them to you. These doors normally require you to solve some tricky puzzle to open them, or trek through the entire area to find the item needed. This one isn't too hard though as there are two small buttons on northwest and southeast corners of this room.
There is a blue glow coming from the next room to the south. This is your first Crystal of Life. These crystals are the only way to resurrect any fallen party members. Just a bit further to the stairs, but don't forget the Scroll of Poison Cloud on your way.
Items Found: Scroll of Poison Cloud, Whitewood Wand

Continue to Level 2
Quick Level Select:
Level 01 Level 02 Level 03 Level 04 Level 05 Level 06 Level 07 Level 08 Level 09 Level 10 Levels 11-13
Other Sections:
Character Guide Potions Secrets Spellcraft Treasures Walkthrough Gallery