
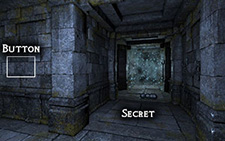
 Legend of Grimrock Secrets
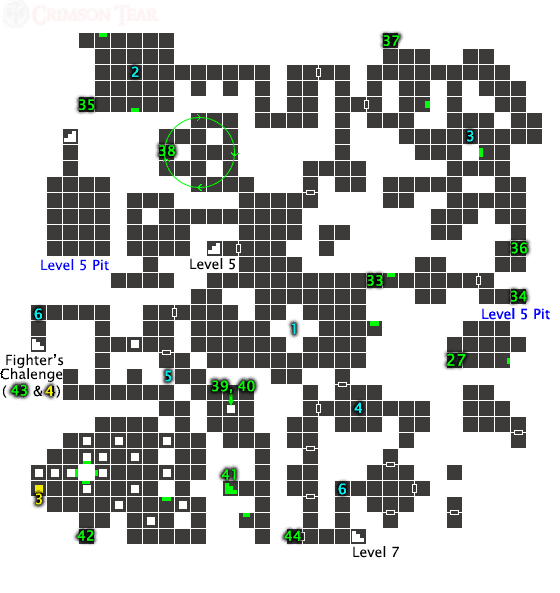
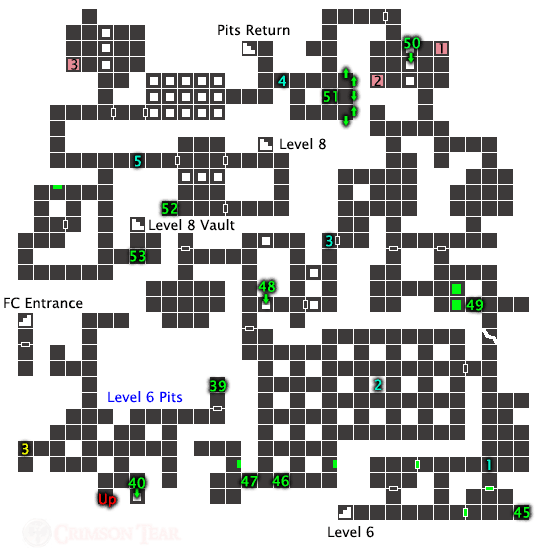
Throughout Legend of Grimrock there are 71 secret areas holding amazing goodies, but finding them all is no easy task, especially since some secrets are nested within other secrets themselves. Thankfully, we have them all on display to make your life easier.
Secrets are numbered in the order you should encounter them as you progress through the dungeon.
For more assistance with finding these items, hover over or click on the red highlighted words.
Quick Level Select
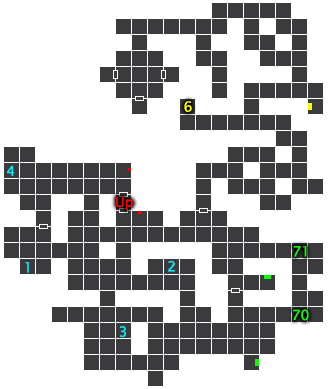
Level 01 Level 02 Level 03 Level 04 Level 05 Level 06 Level 07 Level 08 Level 09 Level 10 Level 13
Level 1
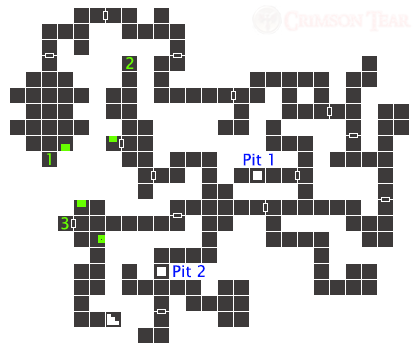
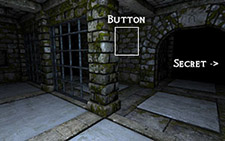
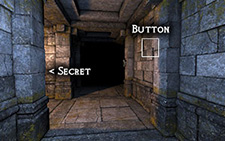
 Secret #1
Lurker Boots, Shuriken
In the very first room of the game, there is a small button on the wall in the south-east corner. A small room on the south side will be revealed with a statue and some very sweet early loot!
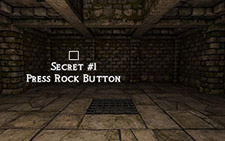
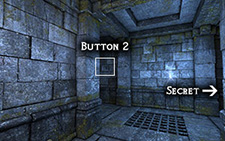
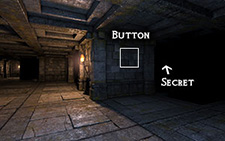
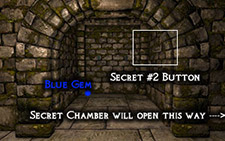 Secret #2
Dagger, Tar Bead, 2 Cave Nettle
In the area where the north Blue Gem is found there is a rectangle button which will open a secret to the north of it. The secret area is located in the dead end to the north of the button near where the switch was to open the gate.
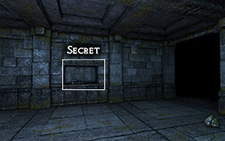
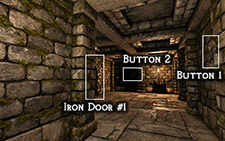 Secret #3
Whitewood Wand
This third secret is actually the games first Iron Door. There are two small stone buttons on walls near the Iron Door -- one on the north-west corner of the room, the other at the south-east corner. Press them both to open the door.
Level 2
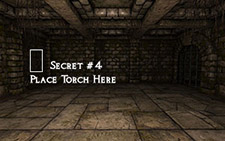 Secret #4
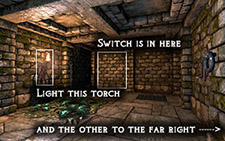
Iron Basinet
After unlocking the first door you will find a room with rune markings and a leaver for the next gate. There is a torch sconce on the left side of the room that needs a torch to open the secret.
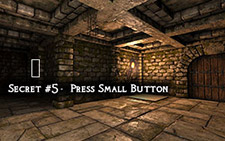 Secret #5
3 Poison Arrows
The secret room is actually one you will see during the regular progression (where you got the brass key). After unlocking the gate with the brass key, head to the left and push the small rock button on the right wall to open the wall to access the secret.
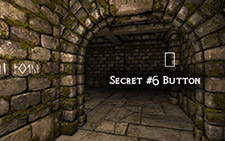 Secret #6
Pointy Shoes
In the room that you need to leave weapon in the alcove to open the door there is a small button on the south-west wall. Press it to open the secret.
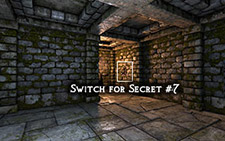
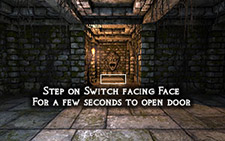
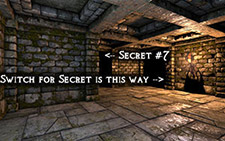 Secret #7
Skull, Phalanx Helmet, Tar Bead, Leather Pants
In the far north-east room of level 2 you will find a switch near the torch. Pull the switch and south then west. The secret chamber will open to your right. There are a Herder and Small Herder inside as well as some items.
 Secret #8
A Box with a Healing Potion, Scroll of Poison Shield, Leather Brigandine
After fighting off the first legion of Skeleton Warriors near Level 2's Iron Gate there is a button on the north-west wall to open a secret room. You may want to move away as a lone Skeleton Warrior will storm out of the room when it opens.
 Secret #9
3 Fire Bombs
To open the 2nd Iron Door, stand on the switch facing the statue until the door opens. You may want to back up when you hear it open since a legion of Skeleton Warriors guard the goods.
Level 3
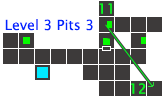
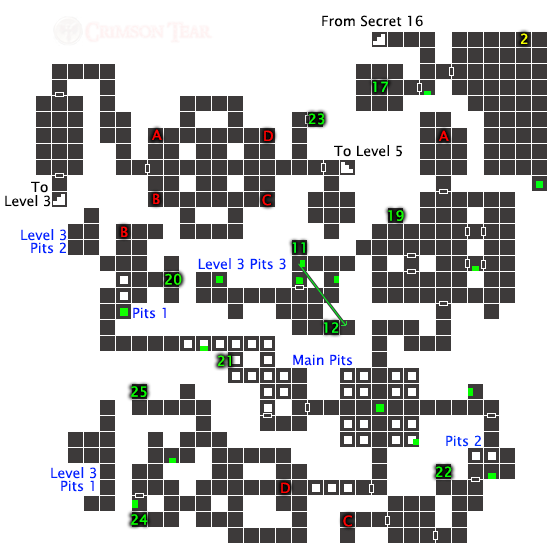
 Secret #10
3 Broadhead Arrows, Short Bow, Shuriken
In the 2nd room of the level, where you meet your first Skeleton Archer, there will be two pits in the middle and a gate. First press the bottom on the west side of the pillar, which will open up the middle area which has a Shuriken and another button on the west wall. Once the gate opens, toss an object across the pits to gain access.
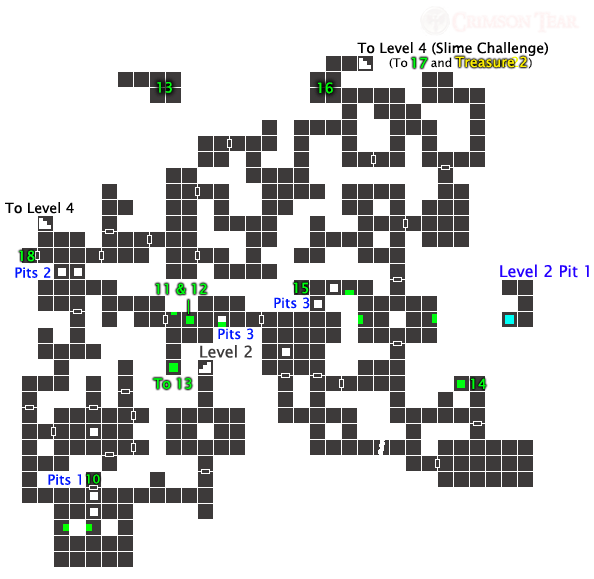
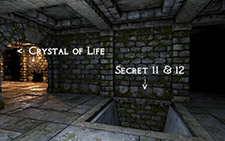 Secret #11
Serpent Bracer
East of the Crystal of Life you will find 2 pits guarded by some Arachnius Gigantus. Dive into either of them and place an object on all 3 pressure switches (you can place objects through bars) then press the button on the eastern pass. (see map) Now you can dive through the pass to the bounty.
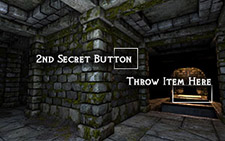
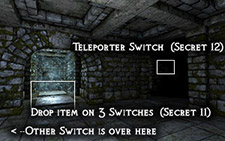 Secret #12
Scroll of Invisibility
Once you finish Secret #11, press the button on the wall to reactivate the teleporter. (see map) The teleporter will take you to a hidden room to the south of it.
 Secret #13
Tome of Health, Shuriken
In the same room as the pits you dive into for Secrets #11 and #12, you will find a button just before the western pit. Press that button then race across to the 2nd pit and press the button above it as you cross it (you will fall down if you don't get off the trap door). This will unlock another teleporter to take you to the next secret.
 Secret #14
Nomad Mittens
In the south-east area, just north of the spider room, there is a button that activates a trap-door that gives you a key. Drop a second item on the pit trap and press the button again to get the secret.
 Secret #15
Cave Nettle, Huntsman's Cloak
East of the teleporter room you'll fine a room with a bunch of Torch Sconces. Place a torch on the 2 outside walls to open access a new area. Inside there is a switch to open the iron door. Head back to the teleporter room to get to the door. If the pit is open just take the object off the pressure switch so you can access the door.
 Secret #16
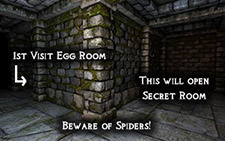
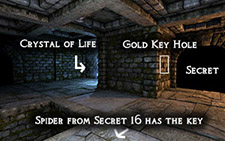
2 Tar Beads, Gold Key
In the northern spider maze you will find some eggs as you start heading south-west toward the exit. Once you pass that first egg a wall will open to the north unleashing more spiders (one has the gold key). Find some Tar Bead inside, plus some stairs down.
 Secret #17
2 Poison Bombs, Crossbow, 6 Poison Quarrels
While officially on Level 4 (see map), it can only be accessed through the stairs in Secret #16. You will need to fight through the Slime Challenge and find the green gem. Put that gem in the mouth of the statue to open the door.
 Secret #18
Ring Boots, Knoffer Mace
There is a door requiring a gold key just before the stairs to the next level. One of the spiders in Secret #16 will drop the gold Key you need.
Level 4
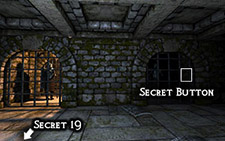 Secret #19
Leather Boots, Ring Gauntlets, Pitroot Bread
In the Beast Gardens and Menagerie, there are 3 cells where you need to trap Skeleton Warriors. The south-east one has a button to open the secret near the north-west corner.
 Secret #20
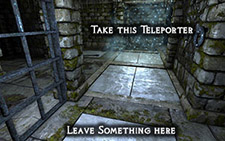
Book of Infinite Wisdom
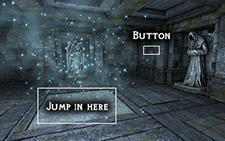
At the beginning of Time and Tide, there will be a pressure switch that activates a teleporter after a few seconds when standing on it. You need to shoot something through it just after the 3rd tick sound to close the pits. Now step off the switch, place something on to activate the teleporter again. Quickly stand where the teleporter appears to get warped into the secret.
Secret #21
Chitin Mask
In Time and Tide (south of Secret #20), you will come to a long timed pit corridor. As you're crossing it, press the button on the right side of the 2nd pit and enter the new passage to the right. Your secret is the item sitting the alcove on the west side, but pick it up quickly or you will fall.
 Secret #22
Venom Edge
During the Trails of Thought pressure switch pit puzzle, directly after the teleporter puzzle, there is a button on the south wall (above the middle switch). Go back to the previous room to find the secret that opened to the west.
 Secret #23
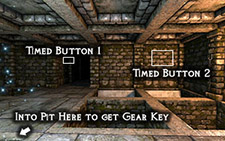
Chitin Greaves
The secret itself is the easy to find Iron Door north of the exit. The gear key needed is at the end of Trails of Thought. As you approach the central pit room, find the button in the south alcove. This is a timed button, so press it, then run just one cell into the pit room cross the two closed south pits, press the button there, and run back to solid ground before the pits open again. You will notice a pit has opened where the teleporter used to be. Dive in and get the Gear Key. Now just head to the Iron Door to claim you loot.
 Secret #24
Bone Amulet and Sack with Leather Gloves, 2 Tar Bead and Burrow Rat Shank
In the Catacomb area, the far south-east area you will see a party of Skeleton Warriors on a floor switch trapped in a cage. Opposite of that cage it the lever to release them. Once you enter that room you will find a button on the east side to access the secret. You will need to fight your way in, though.
 Secret #25
Fire Bomb, Flarefeather Cap
In the Catacomb, just north-east of Secret 24 there is a button on the south wall. This will unleash another party of skeleton warriors. Defeat the small army, then press the button again, which is timed, and rush north then all the way west before the wall closes again.
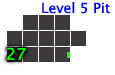
Level 5
 Secret #26
Scaled Cloak
Go into the southeast room of the first area with the gladiator statues, and push the button on the south wall to open the area to the north. Just inside the area that opened up, there will be another button on the west side. The secret room will open to the north-east.
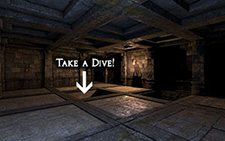 Secret #27
2 Fire Bombs, 2 Lightning Bombs
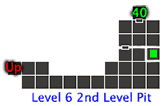
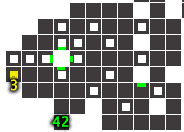
While officially on Level 6 (see map), it can only by diving into a pit on Level 5 in the area east then south of the eastern dragon statue. You will find the button near the teleporter back up, which will also unleash a Wyvern and a Crowern.
 Secret #28
Herder Cap, Conjurer's Cap
This is one of the most annoying puzzles in the game, but most people eventually get the secret open by just randomly mashing buttons and levers. The proper order is the button away from the door once, the lever down and up five times, then the button next to the door once. Be careful, there are 2 Small and Elder Herders inside.
 Secret #29
Fist Dagger
On the south end of the Crystal of Life Room, there is a small button that will open a secret just to the west of it.
 Secret #30
3 Fire Arrows, Huntsman Cloak, Grim Cap
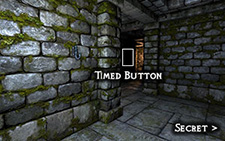
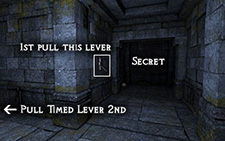
After you find the 2nd Dragon Statue in (the northern one) the Deserted Tunnels, there will be a gate to the west of the dragon. You need to pull the lever beside the gate, follow the passage south back near the door where we entered the area. Find the timed lever you used to open this area originally in the east alcove and race the timer back through the gate.
 Secret #31
Lurker Vest
To open the Iron Door you need to find the 2 Dragon Statues and stand at the spot where they meet on the map for half a minute, which just so happens to be the end of the corridor entering the room where the door is. You should hear the door open as long as you have the sound loud enough.
 Secret #32
Brace of Fortitude
As you use the timed lever to cross the Chamber of Pits, there is a button on the north-west corner to close the pit on the south-east corner. Keep following the pattern until you reach the area to get the secret. There is a button on the wall on this same area that will start the pattern again so you can continue on.
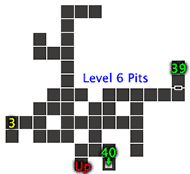
Level 6
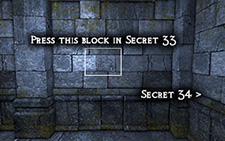
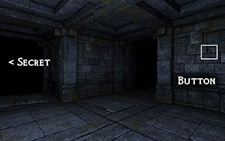
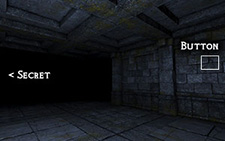
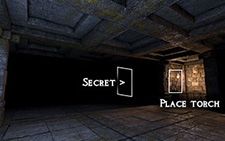 Secret #33
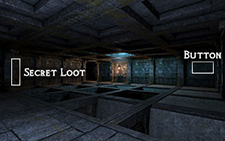
2 Fire Bombs
In the Main Hall, there is an empty torch sconce at the far east side. Place a torch inside and the secret will open a bit north of it. A skeleton makes him home here, so get ready for the fight. This will also give you access to secret #34!
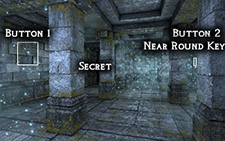
 Secret #34
Orb of Radiance
Inside Secret 33, there is a small block with a symbol on it. Press the button to get into the Orb Vault. To get the amazing item for your mage, you need to place something (not throw!) on the teleporter to continue. You might want to prepare for a harsh fight before continuing as 2 Cave Crabs will come from behind after picking up the orb with no room to avoid them.
 Secret #35
Spirit Mirror Pendant
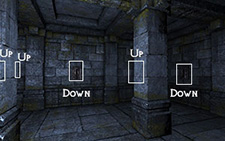
In the Maze of Madness, there are two buttons. One on the south wall accessible from the entrance, and other and the far north-west near the key. The way to the north-west is to take the northwest teleporter, take 1 step back, now one to your left. Once both buttons are pressed, a path along the south side will open.
 Secret #36
Frostbite Necklace
A button is found on a west wall in the central-east area of the Haunted Halls. Press it and a new chamber will open to the south of the floor switch. Two Skeleton Archers haunt this room.
 Secret #37
Ring Boots and Heavy Shield
Straight east of the entrance of the Haunted Halls, within the corner of the backward L on your map, there is a button to open another secret with a legion of skeleton warriors behind it.
 Secret #38
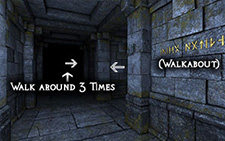
Rock, Sack with Speed Potion and Recipe to make Speed Potions
This is one of the easiest secrets in the game. Just walk clockwise around the walkabout 3 times. A lone skeleton will appear during the walkabout, but it shouldn't be much of a problem at this point.
 Secret #39
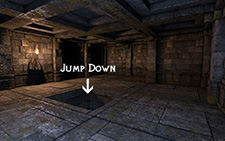
Shuriken, Lurker Pants
Actually on level 7 (see map) but it can only be access via the pit in the Mage's Entrance. Just jump down and collect your loot, the door will open as you grab everything. Many Wyverns and a Crowerns are outside the door, so you will need to fight your way out.
 Secret #40
Full Helmet
Actually on level 8 (see map) but it can only be access via the pits in Level 6, then down the pit again (see map)! On the east side of this room there is a floor switch and Scavengers. Leave something on the switch so it can be grabbed from the other side, then take it off to access the door. You will need to do this again to leave the cage.
 Secret #41
Plate Cuirass, Plate Gauntlets
The hallway that shoots fireballs in the Mages Entrance has 2 alcoves opened by buttons. The far a room has another button that opens stairs back to Level 5 in the first alcove. Expect a firefight as 2 Uggardians protect this secret.
 Secret #42
Ring Mail, Sword of Nex
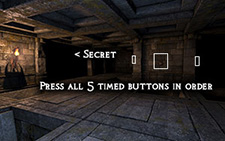
In the huge pit chamber in the Halls of Fire, there will be 5 timed buttons. (see map) The first is just south of the entrance, the second is on the pillar facing you, button 3 is on the opposite side of that pillar, 4 is just left that that one. Quickly backup on that one, and go all the way around to get to 5 which is on the other side of that pillar. This will unleash an Uggardian who protects the secret.
 Secret #43
Poison Bomb, 2 Fire Bombs, Shield of Valor
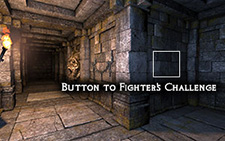
The Sword of Nex from Secret 42 is required! This is the hardest challenge in the game, so you may need to return when your more powerful. Take the north path in the Hall of Fire (after throwing a fireball to the statue to open the path), and press the block with the marking to get to the Fighter's Challenge. REST FIRST!!!
The best strategy I have found is to fight all the way to the gate, then turn to the right and fight to the corner. You might lose someone, like your mage, but you should be able to stick it out and win. Making a few Healing Potions before the battle also helps. Once empty, find the Gold Key and open the lock and claim your prize, the (arguably) best shield in the game!
 Secret #44
Chitin Mail
The Iron Door requires a Round Key. There are 4 throughout Level 6, but only 3 are needed to get to the exit. Find the 4th key by exploring everywhere to open this door.
Level 7
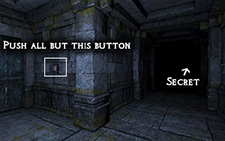 Secret #45
Ring Greaves, Battle Axe, 3 Throwing Knives
At the entrance of Level 7, there are 4 doors. Open all but the first door to open a secret in the south-eastern room.
 Secret #46
Mole Jerky, 2 Crossbow Quarrels, 2 Throwing Axes
In the Maze of Shadows, there is a box of food in the south-west area. Just north of it there is a button to open the secret. Step into the teleporter to enter, but beware of the herders.
 Secret #47
4 Frost Bombs
In Secret 46, there is a block with a marking on it on the east wall that will open another explosive secret.
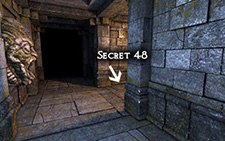 Secret #48
Bracelet of Tirin
After you exit the Maze of Shadows, there will be a pit to your right. Dive in to find the secret.
 Secret #49
Shaman Staff, Scroll of Invisibility
In the room south of the Crystal of Life, there a 2 floor switches. Press the one at the gate, then the one beside it to let the energy through. Follow the path to the left that opens to access the secret on the other side of the gate. Warning: 3 Uggardians protect this secret.
 Secret #50
Boots of Valor
North of the Crystal of Life is a teleporter that crosses a pit. You will need to cross to the far side of the room but each step unleashes a poison bolt. You will need to strafe side to side as you go forward to get to the secret alive. Get ready to fight your way out as crabs and spiders will make your journey difficult, not to mention racing the poison bolts back to the other side.
 Secret #51
Assassin's Dagger
After the Teleporter pit north of the Crystal of Life, there are 5 switches on the wall. The West and South one need to be down, then toggle the center one down then back up.
 Secret #52
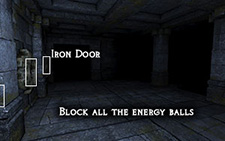
Chitin Boots, Scroll of Enchant Fire Arrow
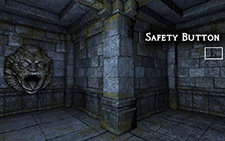
The Iron Door is located just south of the exit, but you need to play a little Dungeon Hero to open it. Strafe back and forth to block all the energy balls to open the door.
 Secret #53
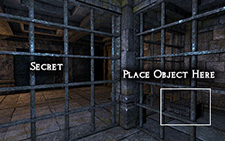
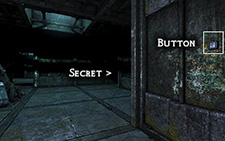
Vault Access
In the area west of the Iron Door puzzle find the brick with a symbol on it near the north-west corner. It is a timed button to rush to the east then south to find a new passage opened on your left. You will know the place once you see the statues. There is no loot here, but it will give you access to most of the secrets on Level 8.

Level 8
 Secret #54
Plate Boots, Plate Gauntlets
Take the entrance from Secret #53 and head east into the Lightning Conduit. The 2nd room the the left will have 3 buttons on the walls, each revealing a pressure plate. One is in the south-west area, one in north-west of the larger area and the third near the east side. Place something on all 3 plates to open the secret to the north-east.
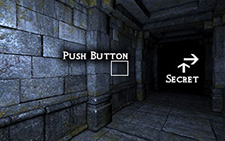
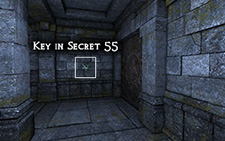
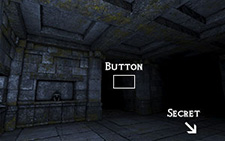
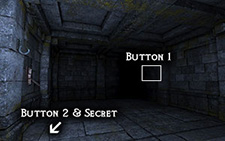 Secret #55
Gear Key (for Secret #59), Lighting Rod, 3 Lightning Bombs
In the southern room of the Lightning Conduit there is a button at the south-west corner. A new path will open to the north-east where you will find a button on the other side, just to your left. This will open another room at the very end of the conduit, so time your dash to reach the other side safely(it will be on your right). Get ready for a confined fight with an ogre.
 Secret #56
2 Throwing Axes, 3 Crossbow Quarrels
In the south-west area of the level there is a large hall with Uggardians. This button is very easy to miss since it is on the east side of north-western pillar of this room.
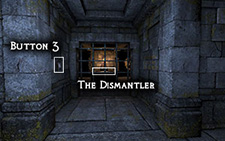 Secret #57
The Dismantler
The Vault of the Dismantler. To access it, you need to take the secret entrance through secret 53. Make your way through the entire area to the west area. In the room with the spider pressing switches, there is a button to the north, one in the southeast and the last one near the south door. Be sure to put the torch found in this room on the sword's resting place before grabbing the Dismantler!
 Secret #58
Milkreed, Grimcap, Blueberry Pie
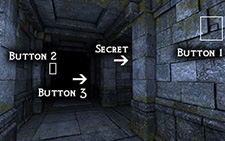
Near the main entrance, there is a button on the north-west corner. A spider has a nest here and it makes really good blueberry pie. Too bad it won't join you as your party's personal chef.
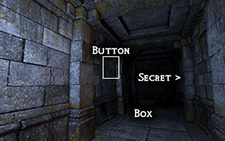
 Secret #59
4 Frost Quarrels, Helm of Valor
The Iron Door is just north of the stairs down. You need the Gear Key found in Secret 55 to open it.
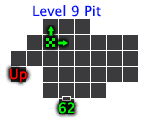
Level 9

 Secret #60
Norja
Destroy the barrels at the north end of the Armoury in the north-west area of the level and press the button on the wall. The secret will open to the south.
 Secret #61
Lightning Bomb, Fire Bomb, Pitfighter Gauntlets
In the north-west area of the Temple Grounds (where you first encounter the Ice Lizards) there is a button that opens a secret directly to the north-east of it.
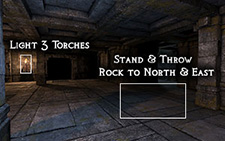 Secret #62
Cuirass of Valor
Fall into the pit in the Outer Sanctum. Light the 3 torches and find where the shadows cross just north east of the teleporter (see map) and throw 2 stones, one north and one east, to open the gate.
 Secret #63
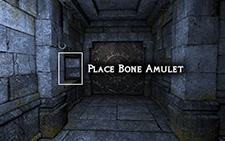
Zhandul's Orb
The Iron Door is located in the south-west area of the level, but you need a Bone Amulet to open it. I hope you are wearing one because this is one amazingly powerful item for your mage!
Level 10
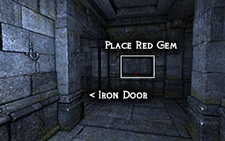 Secret #64
Throwing Axe, Crookhorn Longbow
The Iron Door beside the Crystal of Life, just north-west of the stairs down, needs the Red Gem found near the entrance of this level. Did you leave it in an alcove somewhere?
 Secret #65
Shield of the Elements
From the Crystal of Life room, go east, then north until you get to a large room. There is a pit in the north east corner. Dive in, fight the crabs, and take the stairs back up to collect your item. If you have the Shield of Valor you will have to compare your fighting style to see which is better (or keep both if you have two warriors).
 Secret #66
2 Blooddrop Blossom, 4 Fire Quarrel, Note From Toorum
In the room directly north of the Crystal of Life there is a button on the south face of the pillar. This will also give you another access to the Crystal for what you find in Secret #67.
 Secret #67
2 Notes from Toorum, Phalanx Helmet, Hardstone Bracelet, Tattered Cloak, Ancient Axe, Remains of Toorum
In the large caverns that cover the north part of the level there is a pillar on the east side with a button on the west face. The secret will open just south-east of it. Will you aid a fellow prisoner?
 Secret #68
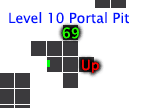
Icefall Hammer
Dive into north-western pit in the Eastern Cavern. Walk around to the far north-east side to find the alcove with the hammer (see map). Get ready for a fight, this will free many enemies.
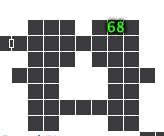
 Secret #69
Scaled Cloak, Sack with Tar Bead and 2 Burrow Rat Shank
In the room that you needed to Ornate Keys to get into, press the button on the back-right wall to deactivate the teleporter and jump into the pit. Press the button on the southwest side to prevent being killed then grab your loot (see map).
Level 13
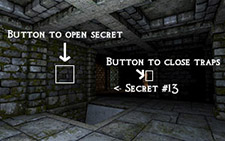
 Secret #70
Burrow Rat Shank, Baked Maggot, 4 Fire Bombs
Find the button in the south-east area of Level 13 to open the secret just to the north-east of it.
 Secret #71
Box with 4 Tar Bead, Slime Bell, 2 Flasks
The final secret of the game is just north of Secret #70. The button is directly north of the button for Secret #70 on the east side of the dead-end. Head north-east to find the room.
Other Sections:
Character Guide Potions Secrets Spellcraft Treasures Walkthrough Gallery