


Walkthrough
The sixth Wizardry game is composed of nine larger areas, with the Castle at the center of it all.
Optional sections of the walkthrough are in blue text so you can skip the unnessary to charge forward on your adventure.
Enemies in this area:
Accursed One Assassin Chunin Daisho Master Dark Crusader Drow Elf Goblin Goblin Priest Goblin Shaman Gremlin Guardian of Ramm Haunt Highlander Knight of Death Liche Monstrous Snake Ninja Poison Giant Poison Viper Samurai Twisted Sylph Tyrannasaurus Will O’ Wisp Wraith Lord Yuan-Ti
Like the Swamp, even though there is water in this area, the Water Wings also do not work here. Be sure to save often, especially since some enemies here can wipe out the entire party with a single spell. I would recommend checking the map frequently as you navigate this area, especially once you get to the dark forest.
Depending on your past choices, you will need several items to thwart your nemesis. Most of this area other than the staff can be skipped depending on which ally you chose. If you don't know for sure, collect all the items in this area.
There are no healing shines in these final areas, meaning you will be stuck relying on reseting and healing items. Once you find the Faeries, buy healing items like Herbal Patties and Magic Cookies. You should have plenty of money to spend at thie point and well equipped for the coming battles.
Travel to the far west side of the forest to find the shipwreck. Since you cannot walk on water, there is only one entrance to board it. Once you are on the ship, turn right. Explore the northern part of this ship, where you will find three Holy Stakes of Wood, which are perfect for piercing a vampire's heart (#1).
Exit the ship, swing right, then immediately left. Follow the path, and don't take any of the side paths until you pass the double arches, then turn left to head north. Continue through the route until it turns right twice. Immediately check the left wall for a button to find the remains of a monk to find Holy H2O+ and a Jade Figurine (#2).
Turn around, go left (south), then follow the path following the left wall until you reach the end. Break the shiny rock with the Miner's Pick to get four Rock of Reflections (#3).
The next item will take us into the Dark Forest. Turn around, go left, then continue south until you reach the larger arched rooms. If you turn right here, you will enter the dark forest. Once you're in the dark, follow the path each turn until you bump into the wall by going right, left, right, left, right, right, and left.
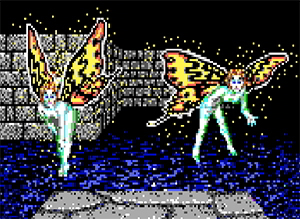
In this light area, go to the chest to find the Tinkerbell (#4). No, not the fairy, but it is fairy related. Go back the same way as you came to return to the double-arched room. The path back is right one step, left, left one step, right and left. Once you're in the light, turn left and follow the left wall until you reach the dancing lights and the stone circle at the end. This area contains enemies not found anywhere else, so be careful.
Use the Tinkerbell to summon the Saeren, the Queen of Faeries. Buy as much as you want while you're here; this is the final shop in the game. You are also about to lose all your money.
I recommend that everyone repeatedly trade with her until you can use all your money on Herbal Patties, Magic Cookies and Hv. Heals.
Ask the queen about "Rumors," "Where is the Delphi," and "What does the Delphi Know." With this knowledge, head back to the Dark Forest enterance via the same path as we used to get the Tinkerbell.
There are multiple paths to get there, but I will provide you with the two I find the easiest to follow.
When entering the darkness going south, take the following path: right, left, right for one step, left, right for one step, left, left, left, right, left for one step, right, right, left, left.
Once you reach the Delphi, repeat what the Queen of Faeries spoke to you: "We are fascination" and "We seek divination." If you tell the Delphi you will pay, a vision will be shown to you what you need to triumph over your foe. That includes the articles you should already possess: Rock of Reflections, Holy H2O+, Holy Stakes of Wood, and the Silver Cross. The Delphi will give you the Staff of Aram, which is required to enter the Temple.
You will be playing with cursed items frequently, so expect to equip, then unequip often. Thankfully, you don't need to use Remove Curse to unequip these items, but they still have harmful effects.
Return to the Temple of Ramm in the north area. Here you will find two stairs that go down and one up. Down returns to the jail. The gate protects the stairs up, which will only open if someone is wearing the Goat's Mask, which you have been holding since the Castle.
Continue to the Temple of Ramm