


Walkthrough
The sixth Wizardry game is composed of nine larger areas, with the Castle at the center of it all.


Optional sections of the walkthrough are in blue text so you can skip the unnessary to charge forward on your adventure.
Enemies in this area:
Acid Slime Cold Slime Floater Forager Giant Ant Giant Wyrm Major Dwarf Miner Dwarf Miner Giant Rubber Beast Trickster Vaspess White Wyrm
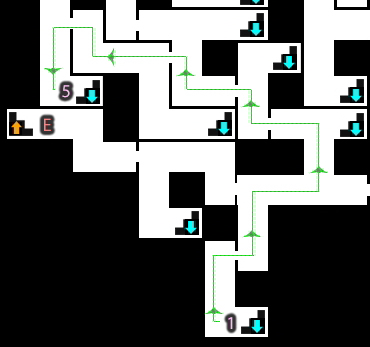
The Mine Area is a massive maze with several stairs to traverse the levels, so I highly recommend that you study the maps for this area. From the entrance, follow the path south until you see a route to the left going east. Follow it to the wall, take two right corners, then a left turn until the wall. You will find two paths that head into darkened sections - choose the right-side route.
In dark places, the only way to know where you are is by walking into a wall. (It will tell you Ouch.) Go straight until the wall, head right, then turn right again and go forward one space. If you search this wall, it will reveal a button that opens a small chest room. This room contains the very important Key of A Minor.
We now need to backtrack the way we came, but the room is a bit oddly shaped, so it isn't the same path. Move ahead until you walk into a wall, turn left, then proceed until you run into a wall again. Turn around, take one step and turn right, then continue until you are back into the light again.
Turn around as we will need to return to the dark. As soon as you enter the darkness, turn right. Continue to the wall, go right, left, then finally turn right to return to the wondrous light.
Our next goal is to take stairs #1 going down. To get there, go straight until the open doorway, then go left and continue down this path until the stairs.
You will find yourself in the dark again. I advise you to turn right at first, hit the wall, then proceed right. You will find yourself in a lit room with a fountain. This fountain is a miracle-worker! It will restore your Stamina, Hit Points, and Magic Points, plus cure Stone. It is a bit of a pain to get to, but with the difficult battles ahead, healing frequently may be needed. This fountain is also an excellent place to level your party in safety.
Head back into the darkness, go straight, right, right, right, left, right, right and right again. Once you enter the door and back into the light, SAVE. If we venture into the left corner, you will encounter the first of the Rubber Beasts. Use only physical attacks on this creature due to the high resistance it possesses. The Rubber Strand you get here will be one of four you will need to progress.
Take the route to the right through the two doors and up Stairs #2. Follow the trail and turn right at the first junction, then down Stairs #3. The left pathway heads to an optional treasure, while the way right contains an essential item. After entering the room and the end of the left tunnel, search the left wall to find a button. Pressing this will reveal another chest room which contains the Miner's Chisel.
Go back up via Stairs #3. Aditional random treasure is available down via stairs #4 if you take the right path. Afterwards, you will need to backtrack down via stairs #2, through the dark corridor and up #1 to return to the first floor of the Mine.
Our next goal is to find Smitty, the blacksmith/chef in the mines. To get there, take Stair #5. I would recommend looking at the map below as getting there takes a bit of zig-zagging.
Smitty doesn't have many conversation points, but he makes up for it with his weapons and corn. Yes, corn. Hint, hint. Don't be afraid of changing weapon types for your fighters; the Vulcan Hammer is especially useful due to its fire resistance and high damage output. Just don't throw it, or you will need to buy another one.
If you choose to murder Smitty, you will be given the Liquid Metal, which is needed to repair an item found later.
Once you've done your shopping, exit the room and choose the right path to the north. The first room is empty, but the next corner has a button that reveals a random chest full of magical items. Continue through the next room, past the stairs and into a fight with the second Rubber Beast. Once you defeat the beast and claim your second Rubber Strand, merge the two strands to form a Rubber Braid.
Head up the nearby Stairs #6 to return to the first floor. Take a couple of rights, straight to the far wall. then left to Stairs #7. A third Rubber Beast makes its nest in the room via this path.
Return up to the first floor once it's defeated. If you follow Stairs #8, you will find another chest with random items.
Take the north-eastern Stair #9, then the next stairs down (E) to continue down to the third level of the mines.
The fourth Rubber Beast makes its nest in the north-east corner. Once defeated, combine the second set of Rubber Strands to form another Rubber Braid, then combine the two Braids to form a Rubber Band.
With the Rubber Band in your possession, take the left (western) door and back up via Stairs A. Continue west through the two doorways. An optional chest is available if you take the next stairs B going down. The chest is behind a locked portcullis that will unlock with the Key of A Minor. Return up the stairs once you are done.
Head up the western stairs #10 and return to the north-eastern stairs #9. This time, continue south past the first stairs down, then take two right turns to Stairs F. Go down to the next floor and follow the pathway to the end. You will encounter an unusual crystal blocking your entry into the middle of the room. Use the Miner's Chisel to crack it in this area, then return up. We will need to hit the crystal in four areas to proceed.

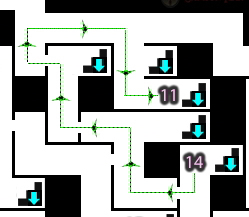
Continue west up via Stairs #13, then take two rights to Stair #14. Follow the path to the fourth level.
First, take the right path into the west room and open the chest here. The Angel's Tongue is an extremely helpful instrument for your Bard. Head back to the junction again.
This time, continue east toward the two stairs down. The right stairs lead to another Rubber Beast, but you only need to fight it if you are short a Rubber Strand. If you choose to fight it you will be stuck with a useless Rubber Strand in your inventory. Instead, take the left stairs #6 to crack the crystal with the Chisel.
Return to the top floor via stairs #14 and head over to stairs #11. Follow the map below if you find yourself lost.
Continue down to the bottom floor. Two paths await you ahead. Take the left route first until you reach the crystal wall. Use the Miner's Chisel to fracture the crystal again, then return up to the previous floor.
Take two lefts, and you will reach another choice. If you take a left, you will be able to open another chest behind a portcullis unlocked with the Key of A Minor. The right path will bring you to the crystal on the bottom floor, where you will need to crack it with the Miner's Pick. Hitting it again here at the south end will cause it to shatter. It will only break if your last hit is in this area.
Finally, we get to hear the story of the Cosmic Forge. Where most games will give you this at the beginning, this game had you fighting your way to this deep mine to learn your goal in the game. After a very long-winded block of text, you will be free to search the corpse here. You will find a Key of Wizard Cave and more items specifically designed for your Mage, Alchemist, Psionic, or Bishop.
Head back to the first floor, then head east to the area with the two dark paths. This time, take the left route, turn left to the wall, turn right for one step, left for two more steps, then right once more to return to the light.
We have now entered the Wizard's Cave part of the Mines. Our first goal is the room in the far north-east corner. Proceed to the end of the corridor, ignoring the first room. Use the Key of Wizard Cave to encounter a Snake. Don't be alarmed - this is Mystaphaphas. If you speak to him, you will learn more about the story of the Cosmic Forge. Give him some Roasted Corn to get a hint about the Cave.
If you hate snakes, you can also fight Mystaphaphas, but don't expect to walk away with much other than experience and venom flowing through your veins.
Return the previous gate and also open it with the Key of Wizard Cave. The far Portcullis can also be unlocked with the same key. For now, the stairs lead to dead-ends, and while there are things we can open at the Castle, I would recommend exploring the Mountains first.
Make your to Stairs D at the west end of the mines to go up to the Mountain Area.
Continue to the Mountains