
 Legend of Grimrock Walkthrough:
Level 6
This is the first level that you will come across one of the most difficult creatures in the game; an Ogre, as well as the nasty Uggardians! It is also from this level that you can access one of the hardest parts of the game, The Fighter's Challenge.
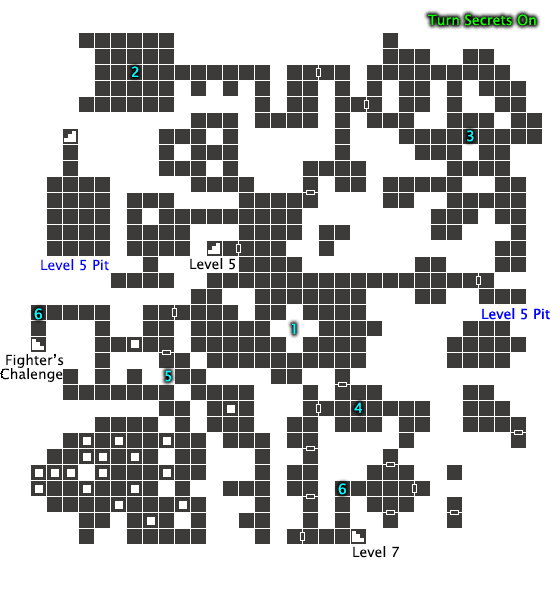
1. Main Hall
Level 6 greets you with a bang. As soon as you enter the area a bunch of spiders with jump on you, and you have to tackle your very first Ogre! The Spiders will likely be a pushover by now, but the Ogre can kill you very quickly.
There are two ways to kill an Ogre without taking too much damage:
Ranged method: Stand in the Ogre's path, pelting him with ranged attacks. When he charges, strafe out of his way, turn around and continue attacking him. Repeat until victory.
Melee method: Stand close to a wall and get Ogre's attention, and when it charges you, strafe to let him by you. The Ogre will smash into a wall. While its back is turned, hit him with whatever you got (back-stabs work great!) until it starts to turn around, then back up, let it charge and strafe out of it's way again. Repeat as needed.
Once the huge beast is dead, grab the key from its corpse, head north of the entrance and kill more spiders, looting what you need along the way.
Continue north to the Walkabout. Walk around the outside of this area in a clockwise pattern 3 times to get a sack. You should hear a click each time you cross the South, West and North passes. First time you will get a rock, then a Skeleton Warrior, and lastly a sack.
Before taking any of the other exits, head to the east side of the hall. Here you will find an empty torch sconce that needs a torch. This will open a room just a bit to the north with a skeleton. Loot but don't leave. Hidden on the north wall of this secret is an brick with an odd symbol on it. Press this to open the vault.
To get to the magical weapon, you will need to place something into the teleporter to open the gate. Be sure to drop and item and not throw one. You now have a clear path to the Orb of Radiance, which increases magic abilities, as well as negating any need to carry a torch or casting a light spell! Be careful, two Cave Crabs will come from behind after picking up the orb.
Items Found: Burrow Rat Shank, Cutlass, Fire Bombs (2), Gold Key, Milkreed, Orb of Radiance, Rock, Sack of Food, Speed Potion, Speed Potion Recipe, Throwing Knife (2).
2. Maze of Madness
Now, head back to the Main Hall and take the unnamed path to the northeast. Don't enter the Haunted Halls yet, open the door further to the north. Hungry? Lots of snails to munch to pieces here. These snails also re-spawn after a while, so if you find your party is running low on energy in this level, stop by here for a snack.
At this point, you should have enough light-weight food that you will not need to carry the heavy ones, so when you come across the heavy food, just eat it or leave it.
As you continue west, you will come across some teleporters. First, avoid the teleporters and push the button on the south side, then head all the way to the north side and step on the teleporter there. Take 1 step back, then strafe to your left. You now have a clear path to the key in the northwest corner. Once you have that key press the button on the north wall. Now just take random teleporters until your back at the beginning, then follow the south wall (where we pushed the first button) and you will find a new path has opened to an amazing item! Once you have it, head back toward the Main Hall, but take the east path into the Haunted Halls.
Items Found: Round Key, Spirit Mirror Pendant

3. Haunted Halls
This area will give you an unlimited supply of Skeleton Warriors, but one at a time. The last area that did this needed them to open the path, so this one does to. There is a floor switch in the southeast area that needs someone to stand on it, an object doesn't work. The trick is to stand on this switch for long enough to get an enemy after you, then when they are close and about to step on the switch, make a mad dash west to get inside the room. Take the loot, then flip the lever to exit.
There is also a button is found in the central-east area of this room. Press it and a new chamber will open to the south of the floor switch. Two Skeleton Archers haunt this room, but so does a sweet accessory.
Straight east of the entrance, inside the curve of the backward L on your map, there is another button to open another secret with a legion of warriors behind it.
Once you got everything you need, head back to the Main Hall, then take the exit to the south.
Items Found: Blooddrop Blossom, Cave Nettle, Frostbite Necklace, Heavy Shield, Ring Boots, Round Key, Tar Bead (2)
4. Sequencis
2 terrifying Cave Crabs make their home in the entrance of Sequencis, so deal with them first. To the west is the Crystal of Life, which requires a Round Key. It is actually the first of many, and you don't have enough to go all the way, so unless you need a resurrection, go east.
Stepping on the teleporter will warp you to 4 different rooms separate, including the room we originally entered from. One with a door, one with a face on the wall and one with a gate. Do not press the button in the one with the face one the wall unless you like Poison Cloud.
First, open the door with the chain and defeat the snail there. You may need to fight it between teleports. Once you can get past it, pull the lever, then reenter the teleporter. The gate is now open, so enter that one and dance with the crab to get another Round Key.
If you just wanting to get to the next level. You now have enough keys to do so. You will find a recipe for Antidote Potions, down there. We need one more key for the Iron Door, plus there is so much left to explore, so let's head to the Halls of Fire, which is the south-west exit of the Main Hall.
Item Found: Round Key
5. Halls of Fire
Part 1: The Double Dip
 As you enter, there will be a Fire Bomb in an alcove and 3 ways to go. This pit entrance isn't the good one, so go south into the Mages' Entrance and fight off the crabs. The middle of this room has another pit. Take it down to another secret. Grab what you want, then open the door. There are several Crowerns and Wyverns here with a scroll, and other items lying around.
The way back up is at the south end, but wait! You aren't done yet. To the left of it is another pit. Take that one down to Level 8! Loot the items but prepare for the Scavengers. To continue, place an item on the switch enclosed in bars so you can access it from the other side. Fight off the Scavengers and collect your item to open the next door.
Just follow your step back out and take the teleporters back up to the Halls of Fire Entrance.
Items Found: Baked Maggot, Blooddrop Blossom, Boiled Crag Beetle, Fire Bomb, Frost Bombs (3), Full Helmet, Lurker Pants, Peasant's Breeches, Sandals, Tar Bead (4)
Part 2: Fireball Hall
Go back into the Mages' Entrance and past the pit. Don't go too far down the hall or you will get torched. The statue at the end breaths Fireballs once you step on the floor switch. 2 spaces before it, on the right wall is a button to save your bacon. This will open up a small room to your left to hide in. Step on the switch then dive back into this room.
This next part takes timing as the Fireballs will keep coming. Facing East, strafe to your right 2 spaces and press the button on the wall, then dive back to the safe room. Wait until you hear the other room open, then make a dash for it between fireballs. Now time your pickups and get the 2 items at the end. If you don't have a mage that can cast Fireball, you will need the Fire Blade.
Before you head back, press the button in the alcove we just opened to access a secret. Make your way back to the first safety alcove and take the stairs back up to Level 5! You will need to fight off Uggardians here, and they are nasty; they throw fireballs at you and do a lot of damage. Best take them out with a strafing ranged attacks. Frostbolt really helps as it freezes them if you can cast it. You can also take Uggardians in melee by using the same strafing technique I mentioned for the crabs.
Now, head back to the entrance of the Halls of Fire. Across the pit there will be another statue. Either cast a fireball spell or use the Fire Blade to toss one at the statue to close the pit. Don't cross yet! Shoot or throw something to trigger a fireball that you can dodge, then cross.
Items Found: Fire Blade, Plate Cuirass, Plate Gauntlets, Scroll of Fireball
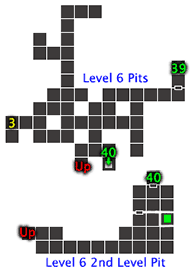
Part 3: The Pits
The Fighter's Challenge is to the left, but you can't pass yet, so go right. Inside there are more pits and more Uggardians. Take out the monsters before doing anything else and ignore the pits. There are buttons scattered throughout too, but only one you can access right now.
These are timed buttons, so you don't have long to find everything, and when you press a button, the platform underneath you will open. Quick strafing past the buttons as you press them are important!
Find the one south of the entrance of this section. Button 2 is on the center pillar facing you. Quickly strafe left and then cross the pit on the far side of the pillar to get the round key. This will unleash another Uggardian. Take the torch to open the path here.
Now we will continue with the buttons. Start at 1 again. Button 3 is on the opposite side of that pillar where we crossed to get the key. 4 is just left that that one, but quickly backup on that one or you will fall. Lastly, 5 is the opposite side of 4, but you need to take the long way around to your left. This will unleash another Uggardian guarding a very important sword.
Before we leave, take the far west pit (the scroll "Westmost" was the hint) to treasure!
Items Found: Golden Crown, Milkreed, Round Key, Ring Mail, Sword of Nex
6. Fighter's Challenge & Exit
With the Sword of Nex in hand, head back to toward the head we tossed that fireball at, and continue across. If you picked up your item, place another to cross safely. There is a marking on a stone at the dead end, press it to go down to the Fighter's Challenge. This is where things get really interesting. You will find yourself surrounded by Scavengers, which you need to kill all of.
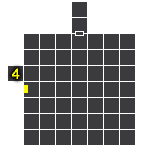 The best strategy I have found is fight strait to the gate, the turn to the right and fight to the corner. You might lose someone, like your mage, but you should be able to stick it out and win. Placing your weakest character in the bottom-left and making a few Healing Potions before the battle also helps.
The gold key is along the south wall, the west wall has a button to treasure. Go open that lock and claim your prize, one of the best shields in the game!
Take the portal back up and head through the main hall, then south to the Crystal of Life. Resurrect any fallen party members as you open the gates and the Iron Door. Before leaving take the left to the Treasury.
Items Found: Ancient Apparatus, Fire Bomb (2), Gold Key, Poison Bomb (2), Shield of Valor
This is actually the 1st of 3 Treasury Vaults (the others are on Levels 9 and 13) which always has 1 key with 3 choices. If you want you can keep the key for the later vaults, or choose one now. I prefer the North one as it makes a big difference for the mage. Once looted, head down to the next level.
South: Blooddrop Blossom, Cave Nettle (2), Fire Bomb (2), Flask, Tar Bead (2)
East: Crossbow
North: Tomb of Fire
Continue to Level 7
Quick Level Select:
Level 01 Level 02 Level 03 Level 04 Level 05 Level 06 Level 07 Level 08 Level 09 Level 10 Levels 11-13
Other Sections:
Character Guide Potions Secrets Spellcraft Treasures Walkthrough Gallery