
 Legend of Grimrock Walkthrough:
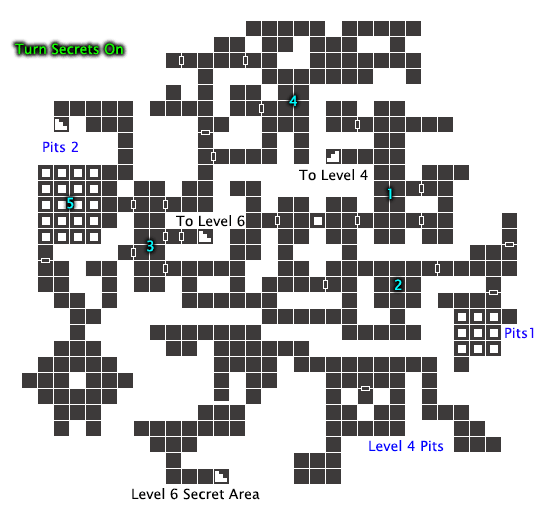
Level 5
The Hallways is a level that looks easy, but it is full of lever puzzles, riddles and walls that open up behind you releasing monsters. Tread with caution.
1. Gladiator Hall
Statues of Gladiators welcome you to level 5. This area may appear to have several options, but really only 2 are accessable. The northwest room has some items in it, but the far southeast area will progress your access. It may look like a dead-end, but if you searth the south wall, you'll find a button to open the path north. Before heading into the new room, searth the west wall where it just opened to find another button to open a secret to the northeast. Go ahead and grab the items inside, but don't forget the Iron Key before leaving. You can either back-track or use the lever to open the door.
Use the key to leave the hall via the southwest and you'll find a pit ahead of you and a branching path heading south. The pit has a note from Toorum if you are trying to get 100%, otherwise ignore it.
Items Found: Baked Maggot (2), Box, Cave Nettle, Crossbow Quarrel (2), Iron Key, Scaled Cloak, Scroll of Fireshield, Scroll of Light, Slime Bell, Tar Bead (2)
2. First Dragon Statue
Feel free to explore the area south of here for more items. A rock slide and a locked door will stop you from progressing west, so once you will be forced to go east. In the first room to the east you will come across a dragon statue. Mark it on your map as you will need it later. The next room has a lever and buttons on the walls and a door to the south. Leave the lever and buttons alone for now as messing with them will give you a headache later. Head south to room with a big pit in the middle.
There are two buttons on the side you are on, and one on the far side. These need to be pressed in a specific order to get the key on the other side. First, press the button closest to the gate, then the one in corner, and the one at the gate again. A bridge to the button on the other side will now be open, so press than button once, then head back to the gate one, then the corner one, and lastly, the button on the far side of the pit again. You now have access to the Iron Key, but once you grab it, a Wyvern and a Crowern will exit out of the walls on the other side. The Crowern you have encountered before, but the Wyvern has a nasty ranged attack that you should do your best to avoid. Ranged attacks are highly recommened.
 Once the nasties are dealt with, press the last button again to cross back again, but don't forget to loot the new areas that opened up too. There are also bombs and another Crowern and Wyvern in the pit if you wish to venture off a bit (see map on right).
As you head back, the room with all the lever and buttons are for a secret, and the Note you found from Toorum will give you a bit of a clue on how to open it. This pattern is very confusing, but if done right the first time you will have no issues. Press the button opposite of the door once, then pull the lever down and up five times, then press the button by the door again. 2 Small Herders and an Elder Herder will come out to play, so prepare for a poison fight.
Items Found: Blooddrop Bloosom, Conjurer's Cap, Fire Bombs (2), Herder Cap, Iron Key, Lightning Bombs (2), Note from Toorum, Pitroot Bread (2), Shuriken

3. The Exit Hall
Now head back past the Dragon statue and open the door with the key we found. More Wyverns and Crowerns are inside, so don't rush in! Once you got rid of the flying vermin, search the area for items, but don't miss the button on the south wall for a secret area.
To the west of the Crystal of Life there will be a chain gate with 2 Cave Crabs. These things are nasty if you don't keep moving since they attack quickly and do plenty of damage, plus they can strafe. The best tactic other then hitting them from a distance is to find an area where you can take on one at a time, with plenty of room to move around in, and to strafing attacks on their sides. What ever direction they are facing, you need to strafe in another one. Keep out of reach of their claws and you'll do fine.
Once you ride yourself of the crabs, head on to the exit hall. Here you will find the stairs down, protected by locks, the Iron Door, and two exits to the north. Before heading out any of the doors, pick up the scroll in the south area. This is the riddle to opening the Iron Door, which since you only know where one dragon is, we have to open it after we explore the Deserted Tunnels.
Items Found: Blooddrop Blossom, Chain Greaves, Fist Dagger, Shuriken, Tattered Cloak
4. Deserted Tunnels
Take the northeast path out and you will come across a timed puzzle. The trick to open the door is to pull the lever, quickly turn around and strafe right, throw something down the hall, then get back through the gate and door before it closes.
Once inside, there is no turning back. As you head down the tunnel, the room to your left has a Tar Bead, but the rest is far from deserted. It is best to wander around this area VERY slowly, defeating enemies as they come out one at a time. Ignore the items for now, and collect them after it is safe. Explorer the west side first, then slowly move to the east, back-tracking to take care of more enemies as the walls open up. Expect Cave Crabs and all the varities of Herders. You will also find your first Milk Reed here, which is needed for Speed Potions.
Once the area is monster free, and you got the place picked clean, head through the door to the west. Hello second dragon! Mark it on your map too. First, pick up the Ornate Key and pull the lever to make the exit back to the Deserted Tunnels Entrance. But wait, there is a gate with goodies by the lever, it didn't open. Ready to do some sprinting? As you exit, you will find that timed lever we used to enter this cursed maze. Pull it again, then race back to the gate to grab the items. Search the walls to get out if you get trapped inside the cage.
Now for the Iron Door! Use your map to find where the dragon's intersect (it should be just down the south hall near the Exit Hall. Stand there until you hear the distant door open. It is really quiet, so you may need to turn up the volume, or just wait there a minute and head over to see if it opened.
Item Found: Fire Arrow (3), Fire Bomb, Grim Cap (2), Huntsman Cloak, Lurker Vest, Milk Reed, Ornate Key, Rock, Shuriken, Tar Bead, War Hammer
5. Chamber of Pits
After looting the Iron Door, take the northwest pass into the last unexplored area. This looks a lot like the past pit room, but it is much more difficult. I would take the pit first to avoid any headaches later. Inside the pit there are lots of Skeleton Warriors and Archers. Get out of the room and into the small hall to deal with them one at a time. Loot the area, then take the stairs back up to the Chamber of Pits.
To cross the pits, you need to pull the lever down then push the button, but this one is automatic. It will run through a timed pattern across the room toward the exit. It isn't too hard to keep up with it, but the trick will be to press the secret button on the west wall. I would recommend watching it a few times, to remember the patern for the first part, the strafe sideways instead of turning along west wall to press the button. This will give you access to the area in the southeast corner. A button there will trigger the pattern again so you can continue on to the next room.
There is another Cave Crab inside the next area, so it is best to keep in an area where you can move around. The button and lever and the wall work the same way as the other side of the chamber.
This area looks simple, but when you pick up the key, Herders and Crabs will come out to play, and the way back will seal. Handle the herders first, while avoiding the crabs, then take the crabs on one at a time. Once you have it cleared, put an item, like a torch, in the area where you grabed the key to open the door again, then use the lever and button to cross the pit again (the pattern is the same, but reversed). A small group of skeletons will greet you on the other side, but they shouldn't be much of an issue anymore.
Just go back to the Exit hall and use the 2 Ornate Keys to head down to Level 6.
Items Found: Blooddrop Blossom, Boiled Crag Beetle, Brace of Fortitude, Burrow Rat Shank, Grim Cap (2), Lightning Bombs (2), Ornate Key, Short Bow, Tar Bead, Tattered Cloak
Continue to Level 6
Quick Level Select:
Level 01 Level 02 Level 03 Level 04 Level 05 Level 06 Level 07 Level 08 Level 09 Level 10 Levels 11-13
Other Sections:
Character Guide Potions Secrets Spellcraft Treasures Walkthrough Gallery