
 Legend of Grimrock Walkthrough:
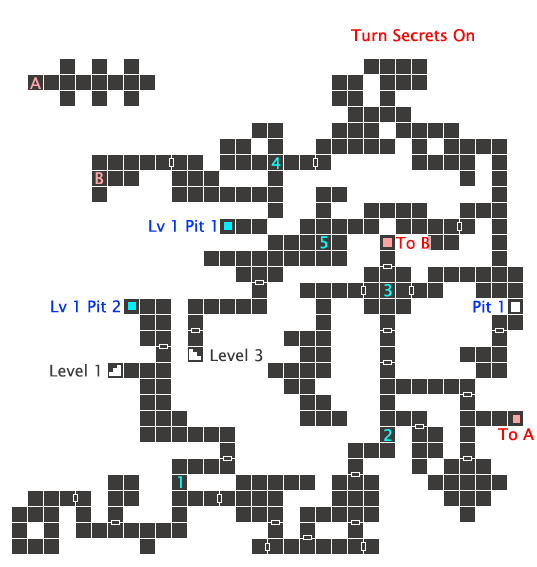
Level 2
This second level turns up the heat very quickly as you get introduced to some of the most annoying monsters in the game. This is a great level to learn how to hack then strafe to avoid damage from creatures that can damage your entire party in one attack.
1. First Tunnels
The entrance of this level will start you right beside the 2nd Pit Trap from the last level. If you didn't take the dive to get the items, you can snag the loot from the passage to the left. The transporter to the first level is no longer active though. If you were already there, take the path to south and to another Large Snail. After defeating the beast, continue down the corridor, opening up the gate with the chain, until you come across a split in the path. To the east you will find a locked door, so since you have no key, continue down the south, then west.
Grab the rock in the alcove to your left, then pull the lever and take the right path. Score all the loot from this area, then continue on west. You will find another door with a chain beside it. Open the door, but don't rush inside.
Here you will encounter a Herder, and 2 Smaller, more vicious, Herders. The regular Herder you can take your time and kill as normal, but the Small Herders will tear you party to pieces if you don't watch out. If you are having problems, kill one, then close the door and wait for your party to heal before going for the next one. It is also a good idea to take Small Herders on in open spaces so you can hit them then strafe to the side to avoid their poison attacks.
Once you got all 3 of them, continue on and grab the Machete, Compass and Iron Key. The compass is a must if you are playing through the game in old school mode since it will show you the direction you are facing. With the Iron Key in hand, head back east and through the locked door we passed earlier.
You will notice some writing on the wall in this room. To the left of it there is a torch sconce. Place a torch into it to access the secret passage. Grab your torch back as you leave the secret, and pull the lever to open the gate.
Items Found: Compass, Dagger, Doublet, Iron Basinet, Iron Key, Machete, Mole Jerky, Peasant's Cap, Rock (2), Silk Hose
2. Jail Cells
A Giant Snail roams these first jail cells, and all of the cages are locked, with no levers here to open them. There are some items you can grab through the bars in the center one, including the key. Don't worry about the other items you can't reach, we'll get them right away. Open the door at the end, then go left. You'll find a rock, but more importantly, a small rock button on the right wall that will open a secret door into the cell we couldn't get the items from.
Back in the main chamber, there are 2 pressure switches, both need to be held down by something. By now, you probably have some weapons and armor that you will never use. Leave them behind on the switches, or drop anything that you don't need, like torches.
On the other side of that door is your first Crowern, so prepare for a short fight since they are very easy. Once you deal with it, you will find yourself with two passages to the east and a locked gate ahead. Take the southern corridor first.
The writing on the wall tells you to leave your weapons behind. Don't leave them all, just place something you aren't using in the shelf to open the gate, then dispatch the 2 Giant Snails inside. Loot the room as you please, but check the southwest wall for a small button! This will open another secret!
Exit the room and take your weapon back as you continue to the next eastern path. Take the simple chain gate and continue straight ahead (we will take the other path later). Arm yourself and step on the pressure switch in the middle. The room will lock and 3 Skeleton Warriors will come out of the walls. The best plan here is to get inside one of those rooms they came out of so you can fight one at a time and not get surrounded. Once defeated, grab the loot, if you don't need their shields or weapons, leave them, and pull the 3 leavers to open the gate (There is one in each room the enemies came out of). Make sure you grab the Bone Amulet, you will need it in a later level! Best to just have a character wear it.
Now take the path with the teleporter. There are a few cells here, one of which has a Skeleton Warrior in it. There are also a few buttons in the middle. Each one will move everything around. Just spam one button until you have defeated the enemy and got the items. Keep the sack as it increases your inventory space, with very little weight. Later in the game you will find boxes too, but don't keep those as they are very heavy.
Now head back and open those gates with the keys you have found and enter the Crystal of Life Room.
Items Found: Brass Key, Bone Amulet, Grim Cap, Iron Key (2), Leather Cap, Pitroot Bread, Pointy Shoes, Poison Arrows (3), Rock (2), Sack, Scroll of Ice Shards, Sandmole Hide Vest, Tattered Cloak
3. Dual Brass Keys
The way forward requires 2 keys, so we're stuck searching the other paths. Head west first and dispatch the 2 Crowern. What will seem like a path to nowhere actually has a button at the very far end (look for it to your right at the torch). A new room will open on the west side with another button. Pressing this one will close the original path, but open another room further to the the north with yet another button and a Crowern. Pressing this last button will open all the walls needed to collect the prize in the southeast corner.
That's one key down, another to go. Head back to the Crystal of Life and take path east. You will find a teleporter in the middle of the path, one that always takes you back one spot. Turn around to find a small button on the west wall. Press it and BACK UP as fast as you can to get past the teleporter.
There is a path north but you have no access to it yet. To cross the pit, just toss another item like a torch across. Another Crowern and items await you on the other side of the door. Before heading back to the Crystal, take your item of the floor plate and dive into that pit to collect more items. A teleporter will take you back up. Now you can head back and to the Crystal of Life and use the two keys.
Items Found: Brass Key (2), Cave Nettle, Grim Cap, Hand Axe, Throwing Knife
4. Lair of the Herders
The teleporter will take you to the other side of the map and the only way out is a small button on the south wall near the gate. The next area is full of Herders and Small Herders, so be on your guard! The next gate also has a button just before it. But before pressing any buttons or switches, it is best to make sure you have got all the enemies and items before unleashing more.
In the far eastern room there is a key hole, but ignore that for now as there are a lot of secrets to explore. There is a button on the south wall of the eastern room that opens a treasure room and the switch to the far north opens a secret and another room back west of the last gate. These do release more Herders too. Once all looted, head back to the east room and use the key.
Items Found: Brass Key, Cave Nettle, Golden Chalice, Grim Cap, Leather Pants, Nomad Boots, Phalanx Helmet, Scroll of Poison Bolt, Skull, Sling, Tar Bead (2), Throwing Knife

5. Legion
There will be a switch at the south end of the hall that will open up the path back to the teleporter room and another with a pressure switch in front of the door to the west. SAVE before entering that door! Step on the switch for a few seconds and the door will open. A Skeleton Warrior will great you as you open it, but that isn't all! A Legion of Warriors are coming! This is a difficult fight at this point in the game, so it may take a few attempts.
After fighting them off ,go the the west end of the passage near the gate. There is a small button on the northwest corner that will open another secret, with another Skeleton Warrior. The next step would be the Iron Door to the north. Just stand on the plate and gaze into the statue's eyes for a few seconds to open the door. But beware! Inside is another Legion of Skeleton Warriors!
Now you can go to the gate and pull the lever. You will find a full sack as you make your way. Now you can do Alchemy! You even get your first 2 recipes.. All that is left is to open the last gate and head to level 3.
Items Found: Alchemy Recipes (2), Box, Cave Nettle, Empty Vial (2), Fire Bomb (2), Healing Potion, Leather Brigandine, Mortar and Pestle, Sack, Scroll of Poison Shield, Tar Bead (2)
Continue to Level 3
Quick Level Select:
Level 01 Level 02 Level 03 Level 04 Level 05 Level 06 Level 07 Level 08 Level 09 Level 10 Levels 11-13
Other Sections:
Character Guide Potions Secrets Spellcraft Treasures Walkthrough Gallery