
 Legend of Grimrock Walkthrough:
Levels 11, 12 and 13
This is the last hurrah! These last three levels actually just one, so they will be handled at the same time.
The stairs down to Level 12 are right away, and left will tell you this level is sealed, so head down to level 12! Don't worry, we'll be back to this level from another path. Use the Prison Key and enter.
Level 12: The Prison

Concentrate on taking out the Goromorg first, then hunt the new big headache! The Warden is a huge armoured monstrosity, but they aren't difficult to avoid. Use the same tactics as you did the Ogre and you should be fine. There are 4 Wardens here, sleeping in the northwest area, so be sure not to wake up more than one at a time.
Once the Wardens are gone, head to where they stood and you will get you another vision. We need 4 parts. There is also a scroll on the east side. Nowhere else to go but down. Choose a pit and dive in.
Level 13: The Cemetery
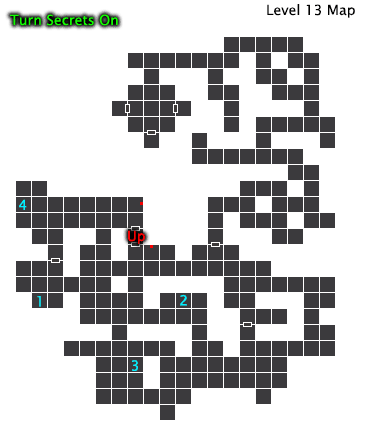
REQUIRED ITEMS:
1. Ore
2. Bladed Gear
3. Infusor
4. Steal Gear
There will be more annoying insects and Sewer Lurkers as you search for the items you need. The button for the teleporter will be northeast. Before going back up, there are lots of things to take up, and most are heavy, but also a lot of junk. You may want to do this in trips, just DON'T put all 4 items in place yet! Ignore the path to the north labelled No Entrance for now.
There are also the last 2 secrets here. There is a button in the southeast that opens a new room and a second one in the corridor north of it. Now head to the area marked as No Entrance to the north.
Lots of spiders and crabs roam this area, and one of those crabs have a Gold Key! The dead end in the east has a button that opens treasure to the west of it. Continue all the way to the end to find the Crystal of Life and the final treasure vault. Pick one of 3 again.
West = 3 Torches, 2 bags of Alchemy Ingredients and potions.
South = A Full suit of plate armour (Boots, Cuirass, Gauntlets, Greaves, Full Helmet)
East = 2 Fire Bomb, 2 Lightning Bomb, Fire Blade
Now head back to the teleporter and Level 12. After putting the 4 parts into the mechanism, the Undying will come to life and enemies will be all over the place. You will not survive this encounter as the Undying is immune to all your weapons and spells! Avoid the cube and all the enemies and find the portal in the southeast! These stairs will take you back to Level 11.
Items Found: Baked Maggot (2), Bladed Gear, Boiled Crag Beetle, Box of Items (2), Burrow Rat Shank, Fire Bombs (4), Fume Metal Frame, Globe of Tetharion, Gold Key, Infusor, Nozzle, Ore, Pipe, Ring Gauntlets, Sack of Torches, Shaft, Steal Gear, Steam Canister, Tattered Cloak.
Level 11: Tomb of the Designers
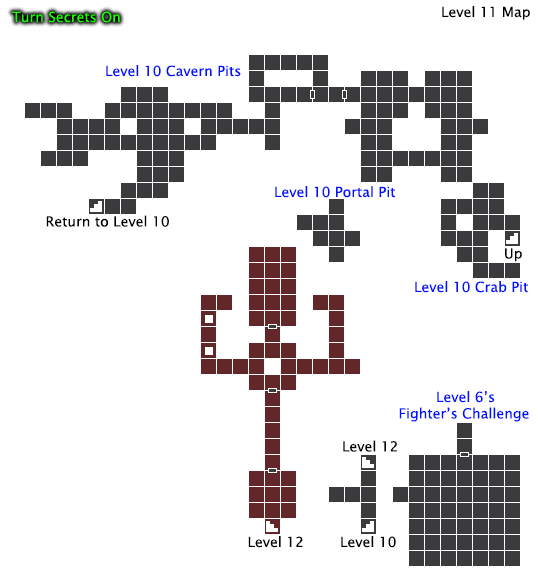
As you enter, note the button on the right wall. There will be 2 more buttons like it on the other side the of the hall. This will be important to survive the next trap. Face the button, step on the switch, strafe back to this button, then get to the other side, push the button there, turn around, press button 3 and get out as fast as you can.
The door to the north needs to Ornate Keys. Let's go east first. Getting to the key is easy, getting out will be painful if you don't watch out. To escape unharmed, place objects on the switches first. You can even use the same one each time. Before we go west, get the last treasure of the game. On the south side of this path there is a marked brick. Press it to open the door.
Now head west. The key here is to toss an object to the other side when the teleporter is down. You will get hit, and take damage, by it if it isn't. There is a button on the west wall where the teleporter is to close the 2nd pit.
Now open the door and defeat the Uggardian. 2 scrolls are on the sides telling you it needs to be dark for the weapon to appear. Remove all light sources (torches and light spells with dark) to get the weapon. You are now healed and ready for battle. This is the only weapon that can harm the boss, and it is ranged, so equip it on someone in the back row. Take the teleporter back to the action.
Items Found: Goromorg Miniature, Weapon of Power

Level 12: The Undying
Now, use the weapon on the giant roling cube to disable it and pull out the objects you placed to activate it. Other enemies will continue spawning, so keep an eye out for them too. As you defeat the enemies now, they will drop keys to the doors around this level that contain supplies. Once the 4 objects are removed, it can be harmed with normal weapons but will no longer be stunned when you use the Weapon of Power. I find slipping into the pits to heal helps when you get surrounded or take too much damage. Melee attacks are tricky as if you don't time them correctly it will run you over, so be careful. The ending will play as soon as it is dead.
Congratulations!
Quick Level Select:
Level 01 Level 02 Level 03 Level 04 Level 05 Level 06 Level 07 Level 08 Level 09 Level 10 Levels 11-13
Other Sections:
Character Guide Potions Secrets Spellcraft Treasures Walkthrough Gallery